This guide explains how to use Delivery Providers inside Communications to manage the mail, SMS, and push channels that other communication workflows depend on.
Short summary
Delivery Providers is the operational hub for channel setup. Use the tabs to switch between email, SMS, and push, review which provider is currently active, open the provider form to configure credentials, then send a test message before you rely on that provider in live workflows.
Before you start
- Decide whether you are configuring mail, SMS, or push.
- Gather the provider credentials, sender values, and any throttling limits in advance.
- Confirm you have permission to add or edit providers for the selected channel.
Navigation path
Communications -> Delivery providers
Step 1: Open Delivery Providers
Go to Communications in the sidebar and open Delivery providers.

The page shows:
- SMS
- Push Notifications
- the Active Provider summary
- the configured provider cards
- the Test Delivery section
Step 2: Switch to the channel you want to manage
Use the tabs to switch between:
- SMS
- Push Notifications
Each tab only shows providers for that channel. The workspace can still be used to review which provider is active before changing anything.
Step 3: Review the active provider and existing cards
Check the Active Provider summary before editing anything.
Each provider card can show:
- provider name
- provider type
- sender value
- throttle limit
- last verified date
- current active state
Use Configure on a provider card when you want to change the setup. Use the power or active-state control when you need to activate or deactivate a provider.
Step 4: Add or edit a provider
Click Add Provider to open the provider modal.
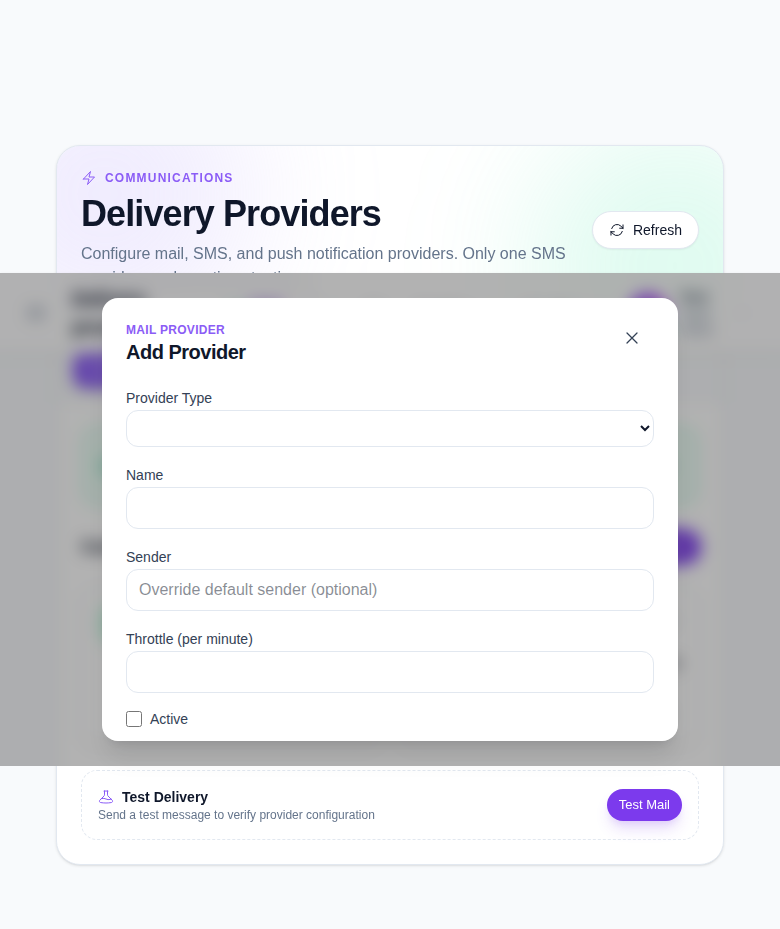
The form includes:
- Provider Type
- Name
- channel-specific Credentials
- Sender
- Throttle Per Minute
- Active
Use Save to store the provider. Use Delete only when you are removing a provider that should no longer exist in the channel list.
Step 5: Send a test message
Use Send Test from the active provider summary or use the small test icon on a provider card.
The test modal lets you choose:
- a target provider or any active provider
- the recipient address, phone number, or push token
- subject and body for mail
- message for SMS
- title and body for push
Send a test message after every meaningful configuration change so you can confirm the provider still works as expected.
Step 6: Confirm the provider state
After saving or testing:
- Return to the provider grid.
- Confirm the active provider summary is correct.
- Check the last verified date if it is shown.
- Make sure the channel still points to the intended active provider.
Important notes
Important: changing delivery providers affects real communication channels. The local UI may still emit an auth profile fetch warning during load, but the delivery-provider workspace and modal are still usable for documented setup flows.
Verification checklist
- The correct channel tab is selected.
- The provider type and name are correct.
- All required credentials are filled in.
- Sender and throttle values are reviewed before saving.
- A test message is sent after configuration.
Expected result: the provider is configured, testable, and ready to be activated for communications workflows.
Troubleshooting
| Issue | Likely cause | What to do |
|---|---|---|
| The active provider summary is wrong | The wrong tab or provider was edited | Reopen the correct channel tab and confirm the active card |
| Save is unavailable | Provider type or name is missing | Fill the required fields in the provider modal |
| Test delivery fails | Provider credentials or sender details are incomplete | Recheck the channel credentials and send the test again |
| SMS activation behaves unexpectedly | More than one SMS provider was changed without review | Confirm the active-state pattern card by card before continuing |