This guide explains how to set up and operate QR attendance in Migdafa Smart School.
Short summary
The QR attendance workflow has three connected areas:
- QR Scanner for live/manual scan input
- QR Attendance Settings for behavior and validation timing
- QR Scan Audit Logs for monitoring scan outcomes
This guide covers configuration, basic validation, and operational verification in that order.
Before you start
- Use the official QR format required by your implementation (use the format helper in the scanner help card when testing).
- Confirm scan devices are already approved for the school’s current operational profile.
- Decide whether you will use camera mode or manual code entry as a fallback.
- Prepare a known student admission number/code for test scan during verification.
Important: if your environment has no camera devices, camera mode cannot initialize. In that case, use Scan Mode Manual for setup and verification.
Navigation path
Attendance -> QR Scanner
Attendance -> QR Scan Audit Logs
Settings -> Attendance -> QR Attendance
Step 1: Open QR Scanner
From the sidebar, open Attendance -> QR Scanner.
On this page you should see:
- QR Attendance summary cards (
Total Scans,Success Rate,Errors) - Quick Actions panel (
View Audit Logs,Reset Statistics,Scanner Settings,Scan Modetoggle) - scanner context section and scan input area
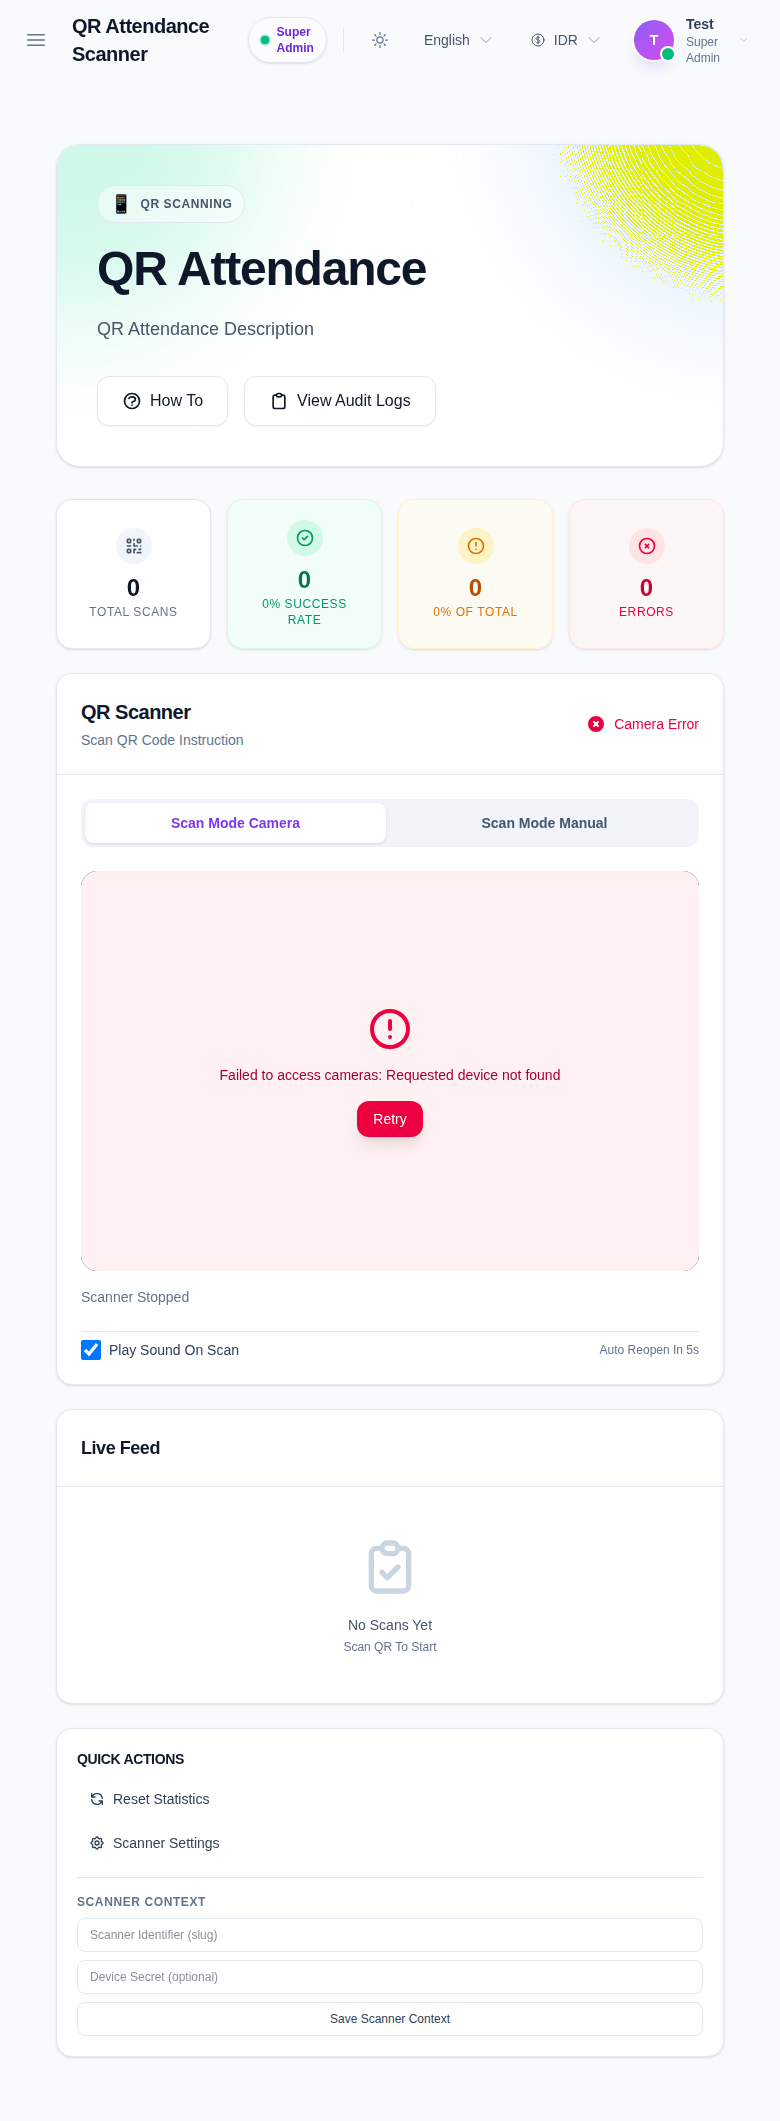
Step 2: Configure scanner context
In Scanner Context, enter values that describe your current scanning station:
- Scanner Identifier (slug): a readable device identifier
- Device Secret (optional): optional secret when secret-based scan validation is used
Click Save Scanner Context.
Step 3: Select scan mode
Choose the mode you can use in your environment:
- Scan Mode Camera: attempts live camera scanning and shows live camera status.
- Scan Mode Manual: allows entering a code directly when camera mode is unavailable or for quick verification.
If camera mode fails with a device error, switch to manual mode and continue setup verification.
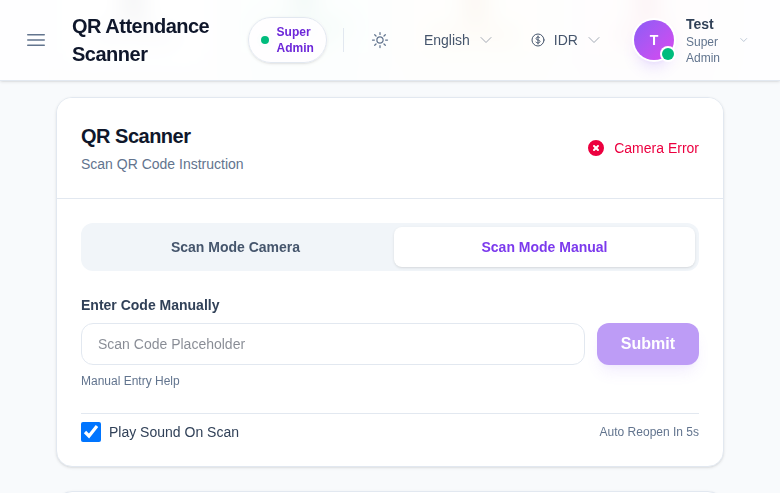
Step 4: Verify accepted QR format and do a test submit
Use one known student admission code and submit in manual mode to validate the end-to-end recognition path.
From the scanner help content shown in the UI, accepted QR data patterns include:
- raw admission number/code format
STU-2025-0005style code (example style shown in UI helper)SS9188style student-session format (example style shown in UI helper)
Result of test submit
- If valid, scan counters update and logs become available.
- If invalid, check the format against the helper text in the scanner panel and confirm the school uses the same scanner format.
Step 5: Tune scan behavior in Quick Actions
Use quick actions as needed:
- Reset Statistics: clears current session scan counters on this workspace.
- Scanner Settings: opens the settings shortcut to global QR attendance configuration.
- View Audit Logs: opens the audit page for scan history and issue triage.
Use this only after context is saved and at least one test scan is verified in your environment.
Step 6: Set global settings
Open Settings -> Attendance -> QR Attendance.
Under General Configuration you can tune:
Auto Submit ScansDuplicate Block Duration(seconds)Rescan Window(seconds)Scanner Reopen Delay(seconds)Allow Manual Override
Click Save changes after adjustments.
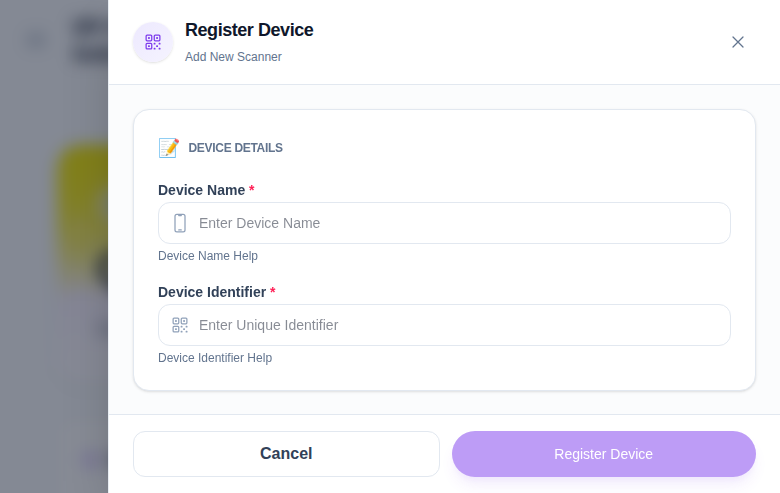
Step 7: Register and manage scanner devices
In the Scanner Devices section, use Register Device to add a scanner endpoint and keep the returned secret/codes for secure operations.
The device list shows registered scanner identities and access actions.
Step 8: Review scan history with Audit Logs
Open Attendance -> QR Scan Audit Logs to confirm what was captured and debug issues.
Use filters for:
- Date
- Status (
Accepted,Duplicate,Rejected,Error,Rescan) - Device
- Admission No / Code search
Verification checklist
- Confirm scanner context is saved.
- Verify manual scan test code submits with the expected status.
- Confirm quick actions and mode toggle work in your local environment.
- Confirm settings values are saved and persist after leaving the settings page.
- Confirm audit filters return expected entries for date/status/admission search.
Expected result: QR attendance is configured with a saved scanner context, behavior settings set per policy, and scan activity visible in the audit log for monitoring.
Troubleshooting
| Issue | Likely cause | What to do |
|---|---|---|
| Camera mode does not start | No camera device found in local browser | Switch to Scan Mode Manual and continue verification from code submit |
| Scan does not increase totals | Wrong context or scan format | Re-check scanner context and submit a known valid code from the helper patterns |
| Error logs appear in scan history | Duplicate or malformed code or policy window mismatch | Review Status, Device, and Date filters before retrying |
| Settings save is not available | Missing edit permission or session issue | Sign in with an account that can edit Attendance settings, then retry |
| Device secret does not match expected value | Device registration secret missing/incorrect | Re-open device registration and use the exact generated secret shown at creation time |